
Image Optimization for Web
Optimized images create a great user experience.
Optimized images create a great user experience.
To ensure you’ll have a high-quality image with great fidelity, you’ll first want to make sure that the original image is the appropriate size for the intended component. Bigger is always better when it comes to the original source image. Once in the design phase, the image will be scaled down to the appropriate height and width for the component.
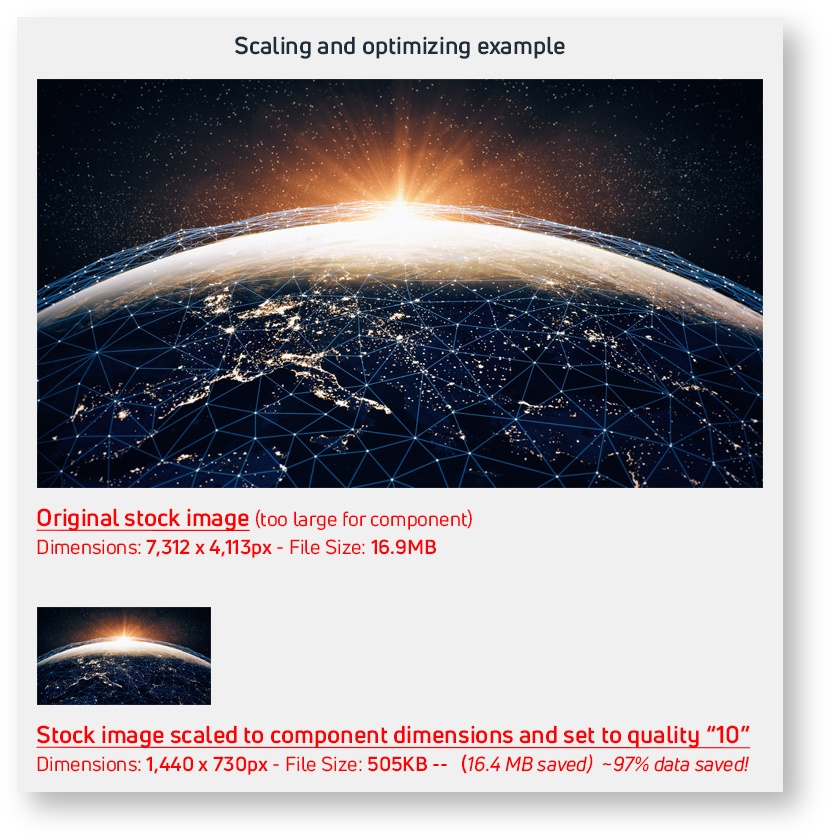
Example: If you need an image for a hero component on Viasat.com you will want a source/stock image that is at least 1440x730 pixels; which is the requirement for the hero component. If you ensure that the source/stock image is no smaller than the component it is meant for, it can always be scaled down while retaining the fidelity of the original image. However, an image that is scaled up will always be degraded and possibly warped.
It’s all about file size. The dimensions given on the redlines for each template are listed in the size that the imagery will be rendered once on the page. By scaling the image to the precise dimensions given, you will reduce the overall file size of the image. Simply put, a 1000x500 pixel image will take up more data than a 500x250 pixel image.
Example 1: For a hero banner in the Desktop view, the dimensions on Viasat.com are 1440(width)x730(height) pixels. While a 2880x1460px sized image would still work within the component, the total data it would take up would be about twice as large as it needs to be and will still only render on the page at 1440x730px causing the page to perform worse and take longer to load.
Again, it all comes down to the total file size which translates directly to a good user experience on the site. Smaller (in file size) images will make for a quicker page load and overall better experience on the site.
Once you have a high-quality image that is sized at the appropriate dimensions of the component it will be placed in, there is one more step to optimize the image for file size while still keeping a high fidelity.
There are two methods to reduce the file size of an asset that you are preparing to be uploaded to Adobe AEM.
If the asset is being prepared in the design phase or you have access to an image editor, the file size can be reduced using the quality slider within the image editing program (Photoshop, Sketch, Figma etc.) when saving the file for the web.
Click here for more detail on how to use Photoshop
If you don't have access to an image editing tool or want to optimize without needing help form design, there are some great and free online tools that help optimize images.
Click here for a couple of links and some tips how to use them.
Currently choose between 2 formats when saving images for AEM, JPG and PNG. Use the following guidelines when choosing the format for your web image:
JPEG
In most cases, this is the best format in which to save photographs.
PNG/PNG‑8
PNGs should only be used for images that contain transparency, like a logo or icon. PNG is an alternative to GIF. Use it for the same purposes (except PNGs does not allow animation). Choose PNG rather than JPEG only when your image contains transparency.
PNG‑24
Like JPEG, this is a good format for photographs. Choose PNG‑24 rather than JPEG only when your image contains transparency. (JPEG does not support transparency; you must fill it with a matte color.) PNG‑24 files are often much larger than JPEG files of the same image.